This is part of our Vendor Guide. View all chapters here.
- Set up your account
- Determine personalization, categories, and attributes
- Add products
- Let us know when to add personalization
First, set up your account.
After submitting an application and completing the interview and approval process, we will create a vendor account for you. You’ll receive an email with a link to set your password and login. Once logged in, go to your vendor dashboard.
Step 1: Store Profile
Fill out your profile under Dashboard > Settings > Store.
Step 2: Shipping
To use our shipping settings for expedited/international orders, there’s nothing you need to do!
Remember, all orders shipped to the 48 continental United States will qualify for free shipping. You are responsible for the cost and creating shipping labels for those orders. Our shipping settings work for non-free-shipping orders (international, HI/AK, and expedited methods).
Step 3: Payment
Add your payment details in Dashboard > Settings > Payment.
You will need a Stripe account, which will allow automatic payouts and easy refunds.
Step 4: Return Policy
Review our return policy under Dashboard > Settings > RMA.
You must select all Refund Reasons, and you may leave everything else as-is. (We already have a pretty good return policy!) If you need to add a return policy specific to your products, do so here.
Step 5: Coupons (optional)
Want to set up coupons to offer customers?
Set up offers in the Dashboard > Coupons tab. Learn more here.
Next, determine your personalization, categories, and attributes
By default, vendors cannot add new categories or filterable attributes. Vendors also cannot set up personalization options. However you can set up product variations, e.g., offering multiple sizes, finish types, or other product options.
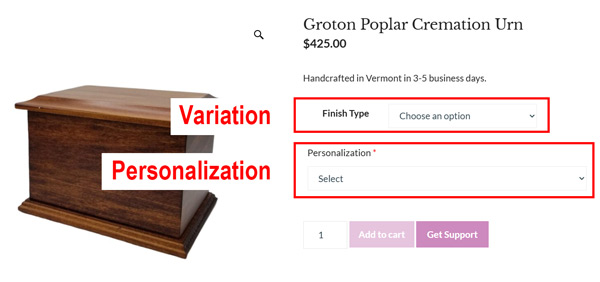
You set up the variations; we set up the personalization.
Send us an email with the following information and we’ll prepare everything for you.
Step 1: Personalization
Send us: Personalization info so we can create options for you.
What type of personalization do you offer? We will create one or more personalization “sets” to apply to your products.
Because customers benefit from simplicity (plus it makes managing products much easier), it is ideal to have simple, straightforward personalization options that apply to as many of your products as possible.
If applicable, give us:
- A description of how you personalize items (name plate, surface engraving, hand-painted, decals, etc)
- Price for adding personalization (free, $10, $40, etc)
- Font options (limiting to 3-5 is best)
- How many lines
- How many characters per line
- Location choices, if applicable (top, bottom, etc)
- Any other important info
- Add-ons you want to feature that aren’t product variations (e.g., add a small keepsake, add a felt bag for remains, etc)
Ideally, your personalization will be brief, simple, and standardized across all (or many) of your products, as in this product page.
Step 2: Categories
Send us: A new category suggestion (if your products don’t fit our current categories).
View our current categories. If you need a new category for your products, let us know.
(However, it will likely be best for us to create new filterable attributes, particularly a Collection; see next.)
Step 3: Filterable Attributes
Send us: Any new filter attributes/values your products may need.
Carefully read through our filterable product attributes. Understanding our attributes will be key to helping customers find your products.
Your products should already fit into many of these attributes. If you need a new attribute for your products, let us know.
Possible new values needed for your product(s):
- Collection
- Color (rarely)
- Feature
- Material
- Stones (for jewelry)
- Theme
Now you are ready to begin adding products
Once you’ve sent us:
- Personalization info
- Any new categories needed
- Any new attributes needed
… then you can start adding products! You can begin before we have personalization set up; we’ll apply it to your products in the back end. You may want to wait for new categories/attributes to be created, otherwise you’ll have to go back and edit your products.
Adding products is pretty self-explanatory, but we created detailed instructions anyways. Here are some of the most important things to consider:
- Title: Should be descriptive and unique, but don’t “keyword stuff.”
- Photos: Add multiples and feature the best one first!
- Variations: Add variations if your product comes in different sizes, colors, finishes, openings, etc. Here are some examples.
- Price: Remember to factor in free shipping and coupons. We highly encourage participation in our wholesale program, which you can enable for each product by simple adding a “wholesale” price.
- Category: Select just one.
- Short Description: This is mandatory and must match this template: “Made to order in Oregon in 3-5 business days. Free ground delivery in the continental USA (1-5 additional days).”
- Description: Short, sweet, and original; and make sure you include cubic inches, dimensions, and any other specs.
- Shipping: Enter the shipping box weight and dimensions.
- Attributes: Use “Custom Attributes” to create variations (if applicable), then use our pre-set attributes to help customers find your product.
- Wholesale price/quantity: This is the price you are willing to sell to our logged-in wholesale customers (generally funeral homes).
- Status: Select “Pending Review” when you’re ready to submit the product to our catalog. We’ll review and approve it asap.
Tip: Create one product, then duplicate it. This will duplicate everything, including the attributes and variations! Then you’ll just need to edit the title, permalink, photo(s), description, SKU, attributes (if applicable), and variation SKU, photo, and price.
Once you’re familiar with the system (and once you start duplicating products!) listing your products will go much faster.
Finally—don’t forget!—we need to add personalization
Important! After you submit a product that needs personalization, let us know so we can apply the personalization option set to your product.
That’s about it! Please carefully review our documentation, and feel free to reach out if you can’t find the answer to your question.